Vietnamese caramelized pork

Vietnamese caramelized pork (thit kho)

So…here’s my first Vietnamese recipe! I know, I know, this can seem odd in a French food blog, but hang on with me, I’ll explain why.

Vietnam was once a French colony. Regardless of what can be thought about colonialism (and I won’t venture there in a food blog!), this has led to some interesting food influences on both sides. Think about Indian and UK food traditions.

In Vietnam, some dishes have been influenced by the French: things like the Banh Mi sandwich in its very French baguette or the god-like Pho which some believe was inspired by the French Pot-au-feu.

In France, we associate a lot of Vietnamese specialties to what we broadly call “Chinese food” – which is, really, a melting pot of South East, Chinese and Japanese food. Things like the Vietnamese rolls (fried or fresh) are very popular for example, and we have A LOT OF Vietnamese restaurants around (have a walk in the 13th District in Paris – you’ll see what I mean).

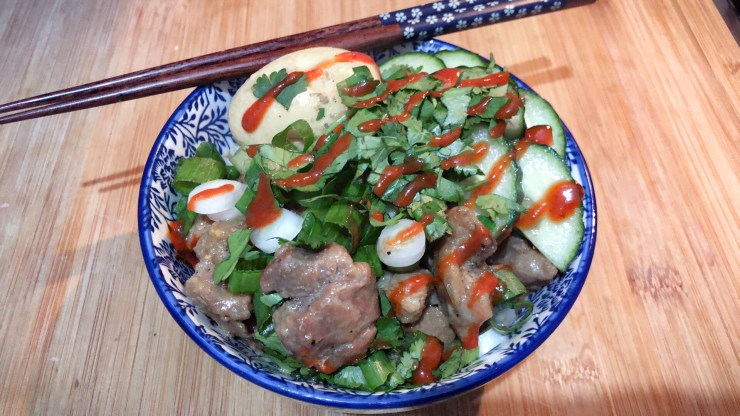
The caramelized pork is bit more obscure to the average French person, but I wanted to start with this one because 1. It’s dead easy 2. It’s delicious 3. It has been a family classic for many generations.

And yes.. another reason for me to write about Vetnamese food is that it is for me, truly, food from back Home. Not going through my entire family tree, but my dad was born in Vietnam from a Vietnamese mother and a mixed French-Vietnamese father, born in Vietnam too. It’s complicated. But what it means, is that I have been eating a lot of Vietnamese food for a very long time.

Preparation time

  • a bit over 1 hour

Ingredients

The meat

  • 4 pork shoulder steak
  • 3 pork belly slices
  • 1 big white onion
  • 4 cloves of garlic
  • 1 thumb of ginger
  • 4 tbsp of sugar
  • 100ml of coconut water
  • 150ml of water
  • 4 tbsp of fish sauce (more or less to taste)
  • 4 eggs
  • Black pepper to taste

The Garnish

  • 1/2 cucumber
  • 1 bunch of fresh coriander
  • 1 bunch of thai basil (optional)
  • 4 spring onions
  • Siracha sauce to taste

Method

Cut the meat and the onion in small chunks and start frying on high heat in a deep casserole dish.

Whilst the meat is starting to brown, mince/crush/grate the garlic and the ginger and add in the dish with the meat. Add the black pepper and fish sauce (don’t get put off by the fish sauce smell – it will quickly evaporate).

Mix 150ml of water with 100ml of coconut water in a separate bowl. Set aside.

In a small sturdy pot, put 4 tablespoons of sugar and let it caramelize under a gentle heat. Don’t add any water and don’t touch it until it starts to get brown. Once the caramel starts forming, keep a close eye on it and keep stiring. You want a dark caramel, but you don’t want to burn it! Stop the heat before you think it’s ready – the caramel will keep cooking quickly, even with the heat off. Stir in the water/coconut water (carefully!!!) and put back on the heat until the caramel has melted again.

Then add the caramel mix to the meat, cover, and let it simmer.

Now it’s time to do the eggs! In the same pot you used to do the caramel, put 4 eggs and cover with boling water. Cook the eggs on medium heat for 10 minutes. Once cooked, run the eggs under cold water (otherwise you will burn yourself) and peel them off. Now you will make 4/5 incisions in the length of each eggs, to ensure that the delicious juices are going everywhere, and add the eggs to the meat/caramel mix. Make sure that the eggs are as covered by the sauce as much as possible.

Cover the dish again and cook for a further 20 minutes, turning the eggs over after 10 minutes. At this stage I usually start the rice, which takes about 20 minutes, so it times perfectly with the meat.

Chop the herbs off, cut your cucumber in half lengthwise and then slice it. Put the garnish is separate bowls.

To serve, start with the rice, then add the meat, 1 egg per person and cover with the garnish. Finish of with some Siracha!

Tip: As for every stew, it is always better re-heated the next day!

Pain de campagne cut in half

Le pain de campagne (with a twist)

Bread is my favourite food – period. I grew up in a French bakery (like, literally, my parents were bakers and the house was above the shop…) so I have lived my childhood surrounded by warm breads and croissants. Not to brag, my dad was one of the best bakers around, and I still find myself comparing each baguette I try with his. None compare obviously. Especially mine.

My modest re-creation of a “Pain de campagne” (most famously known in the UK as a “White Bloomer”), goes against a lot of the holy principles of bread making. It’s not made with “real” fresh yeast, I don’ raise the dough overnight, I add stuff in it… “Bread” – my dad would say – ” should only be made of four ingredients: Flour, Water, Yeast, Salt. Nothing else

Well… sorry to disagree dad, but I like to add stuff!

The flavours I add in are mostly dried – any added moisture could affect the raising process. And I find that adding things like olive, bacon, onions… as good as they are, end up creating something more like a cake than a bread, whilst I like to keep my bread, well….bready, so it can be used as an accompaniment more than food on its own.

For the cheese, stick to a small amount of strong cheese rather than loads of soft one… so parmesan rather than mozarella!

The herbs are inter-changeable: you can use mixed Italian or French herbs, rosemary, thyme.. Just be carefull with fennel as it has a strong anisy taste so I would keep it to 1/2 tsp max. My favourite mix is herbes de Provence / fennel but I highly encourage expirimenting!

Anyways… there you go:

Preparation time

  • Preparation: 15 mins
  • Fermentation: 1 to 5 hours (see details below)
  • Proofing: 30 mins to 2 hours (see details below)
  • Cooking: 30-35 mins

Ingredients

The Base:

  • 250g of all purpose flour and 250g of strong bread flour
  • 320ml of lukewarm water
  • 2 tsp of dried yeast (I don’t like the instant one though – if you use it then use a whole sachet and refer to the tips below to adapt resting times)
  • 1 tsp sugar
  • 1.5 tsp salt (or 8g, more specifically)

The Twist:

  • 1/2 tsp of garlic powder
  • 1 tsp of dried herbes de Provence
  • 1/2 tsp of fennel seeds
  • 1/4 tsp of black pepper
  • 1 cup of grated parmesan
  • 2 tbsp of olive oil

Tips

Making bread depends on A LOT of external factors. Following the exact same recipe to the letter will give you very different outcomes depending on the room temperature, the level of humidity, the type of yeast, type of flour… So I will try to give general indications where I can so you can adapt to your environment.

The flour:

I like to use a mix of plain and strong flour. Plain flour is best if you like your bread fluffy with a crusty crust (think of a good baguette). It is however harder to work with, especially if your are kneading by hand like I am. There is less gluten so it’s hard to get it to the right elastic/firm texture you want to achieve, and it is just very messy and sticky. Strong flour, on the other hand, has got much more gluten and is easier to work with, it will however give you a firmer bread with a chewy texture (think of a good bagel).

I find that half and half hits the sweat spot for me.

Bulk fermentation / proofing times:

This is the hardest part of the process – and the most critical one. Let’s get things clear first: the bulk fermentation is the first resting time, before shaping. The proofing is the second one, after shaping.

In terms of timings – bulk fermentation usually takes 1-3 hours whilst proofing can take 30 mins to 1 hour. If you do these in the fridge (or if your house is VERY cold – though I’d be worried if this is the case), then these can be done overnight. As a rough indication, an eight degrees (celsius) increase in temperature will result in half the resting time (and double if the tempearture decreases). Finally, I use active dry yeast (not the instant one) – but other types of yeast will require other resting times.

BREF, this is all very confusing. The best way to manage these steps is to throw away the recipes (if not physically, at least mentally) and to observe and feel your dough so you know when it’s ready.

Bulk fermentation: if you have kneaded your dough correctly to start with, it should be super firm and elastic, so that if you poke a hole with your finger in it, it will be firm and will spring back to its original shape. At the end of the fermentation, the dough should be much more soft and giggly, and if you poke a hole you should still feel some resistance. If the dough doesn’t resist – then this is over-fermented, meaning that you have exhausted all the bacterias and gluten you had at your disposal. Another good visual rule is that the dough should have doubled in size, but not more.

I usually check every 30 mins.

Proofing: proofing is more visual – the dough should double in size and the dough should look nice and smooth.

I usally check every 15 mins.

In doubt – I recommend going under rather than over: there will be a final proofing happening in the oven anyway – and we want to have some of these lovely bacterias left for it to happen!

Here’s a photo of a loaf I made in very warm weather and over-fermented: the dough had no more energy left, collapsed in proofing, and didn’t raise in the oven. Still very tasty though!

Over-fermented bread

The yeast:

I like dry yeast – but not so much the instant one. Instant yeast means that resting times will be much shorter. Usually you only need one round – so no proofing (although I always recommend to leave the dough to rest a bit after shaping, even just for 10 mins). As a general rule – the faster the resting time, the less complex in flavour the taste. So aim for conditons that will increase the time, rather than reduce it, unless you are in a rush!

Fresh yeast is the best, this is what my dad would use in the bakery, but it is quite fragile and hard to keep, and it is a bit of a faff to use.

Method

Start by mixing your sugar and yeast in the lukewarm water and let it rest for 10 mins. You should get some foam forming at the top.

In the meantime, mix your flour with salt and the rest of the ingredients. Stir well and then pour the water/yeast mixture (stir that well too before pouring).

Start mixing in the bowl, and when all the moisture has been absobed, put it on a work surface. You can add a bit of flour but use as little as humanly possible!

Knead for 8 -10 mins. NO LESS! The dough should be smooth, non-sticky, elastic. If you cut it, the cut should keep its shape and not collapse, if you poke a hole with your finger it should spring back. If you strecth it, it shouldn’t break.

Oil your bowl and put the dough back in, cover it with a plastic film. Let it ferment between 1-3 hours. After 1/2 hour, check the dough and fold back each side back on the middle. This will allow to regulate temperature and to even out the gluten/bacterias mix. Keep checking every 30 mins until ready.

Once fermented, knock your dough with a fist and pre-shape it in a tight ball. Wait 15 mins, then finalise the shaping on its final tray/mold covered with baking parchment (unless you use a cast iron skillet in which case you don’t need the baking parchment). Then proof for 30 mins – 1 hour, checking every 15 mins.

Towards the end of proofing, pre-heat your oven at 200 degrees (I use fan oven) and put an empty tray at the bottom. Boil some water.

When the proofing is finished, put your loaf in the middle of the oven and pour in some boiling water in the bottom tray to create steam. This will give a better crust.

Bake for 30 – 35mins. When coming out of the oven, tke the bread out an leave on an aerated surface – so the steam can escape. If you leave the bread in the mold, the steam will make the bottom soggy – and no one wants a soggy bottom!

Et voilà!

Tuna avocado tartare

Tuna – Avocado Tartare

The sun is shinning, flowers are in bloom, we are all stuck in…there is no better time to make some food without cooking!

Okay, I know it’s a bit odd for you Brits, but I love tartares.. raw meet that is! I am not going hard core for now with my beef tartare (so yummy with chips, a real French pub classic), but I  thought I’d start with something more “gentle”: the tuna tartare.  With all the sushi and that, it should feel a bit more accessible.

It’s super quick, easy, yummy and healthy, what else could you possibly ask for ?

Enough with the patronizing comments, here’s the recipe:

Preparation time

  • Preparation: 20 mins
  • Cooking: NO COOKING YOU FOOL!!!

Ingredients (1 person)

  • 1 tuna steak without skin and bones (can replace with Salmon for a richer texture). IT HAS TO BE SUPER FRESH!!!
  • 1 nice and ripe avocado (Hass is the best)
  • 1 spring onion
  • 2 seafood sticks
  • 1 teaspoon of capres (optional)
  • 1/2 lemon juice
  • 1/2 teaspon of garlic granules
  • 1 tablespoon of olive oil
  • Salt (nice big sea salt flakes if you have!)
  • Cayenne pepper (or just pepper)
  • 1 tbsp of chopped fresh coriander (parsley works too)
  • 1/2 tbsp of chopped fresh dill (I love it with tarragon too – but it’s quite hard to find!)

Method

For the preparation? Chop it all (tuna, avocado and seafood sticks in nice cubes and the rest finely) and put it all in a bowl, stir… And that’s it!!

PS: for the faint hearted (or if you’re not sure how fresh the fish is) – you can quickly sear the tuna in the pan on all sides and let it cool down before adding in. Another option is to let the fish with the lemon and salt to “cook” for an hour before adding in the rest – Ceviche style!